Find Yellow Programming Module
Return to Lesson MenuLesson Overview
Summary
This programming lesson was designed to teach the basics of programming in Open Roberta through a “find yellow” food finding simulation program. Each activity is designed to teach the pieces necessary to build a working “find yellow” program. The activities start by defining and building sequences, identifying repeating patterns (loops), understanding if/then statements, exploring sensors, and finally building the “find yellow” program. Like many engineering problems, there are many possible solutions, which gives students a chance to be creative.
Students work individually on programming, but in teams for knowledge building activities. It is important to encourage everyone to build their own program in Open Roberta. Hands-on programming is the quickest way to learn the software and will help the students in future programming projects.
For editable worksheets and powerpoints please login here.
Big Idea(s)
In engineering, there are multiple ways to solve problems.
Programs are a sequence of steps followed in order by the computer.
Loops simplify programs (steps are repeated inside loops).
If/then statements allow the computer to make choices on how to respond to certain inputs (environmental cues).
If/then statements are simple yes/no questions (true/false, 1/0).
Programs can be written out using flowcharts.
Sensors take inputs (environmental cues) and turn them into code (often coverts inputs them into numbers).
To use sensors in an if/then statement, the sensor inputs need to be converted into yes/no questions (what color do you see –> do you see yellow?).
Often multiple rounds of testing (design, build, test, repeat) are needed to create a successful program.
Vocabulary words
Sequence
Loop
If/then Statement
Input
Flowchart
Sensor
Materials
- Each student will need at least one device (laptop, chromebook, iPad, etc. Must have internet access)
- Each student should have access their own Open Roberta Account. To create an account follow the instructions found here: https://sites.google.com/view/robot-program-guide/
Grouping
Groups of 3-4 students
Timing
5-6 hours (preferably over several days)
Prerequisites for students
Students should have basic computer skills (Using a mouse/touch screen. Using a keyboard. Accessing a website).
Learning goals/objectives for students
- Understand that engineering problems often have more than one solution.
- Identify the sequence of steps (program) required to get the robot to drive in the shape of a square
- Understand the purpose of a loop in programming
- Apply a loop to the square program so that the robot drives in a square continuously
- Understand how flowcharts can be used to write out a program
- Understand that if/then statements allow robots to chose a reponse determined by a yes/no (true/false) questions
- Identify all robot sensors and motors, their uses and limitations
- By combining the data sensors can generate with an understanding of the program objective, create a logic box that lets the if/then statement respond to sensor input
- Create a “find yellow” program by applying the knowledge of programming developed so far
- Troubleshoot the program through careful observation of the program sequence rewrite the program to fix it
Content background for instructor
Open Roberta is a cloud-based programming environment inspired by Scratch. It was selected for this project because it can be easily run on any device with a wifi connection and because it is free. It also allows uses to switch between a few languages, aiding ELL students (language selection if found in the “world icon” menu at the top of the programming window).
Like Scratch, Open Roberta is a visual based programming language, where programs are assembled using a series of blocks that are connected together. To simplify coding, the program only allows blocks that can function together to be connected together. They are color coded with little puzzle pieces to help users identify blocks that fit together.
Programming can be divided into two sets of concepts: sequences and choices (if/then statements):
Sequences are the steps of the program. The robot will follow the steps of the program exactly as written. If any of the steps are out of order, the robot may behave in an unexpected or unintended way. Often errors in a program result from steps that are out of order, so this is a great place to start when troubleshooting a program. There are a few spots where students get stuck. 1) Loops: the only steps inside the loop will be repeated. If a program enters an infinite loop, it will never leave it unless gets to a “break out of loop” block. 2) One step at a time: the robot (or program) will only do one thing at a time. If you, for example, have a “drive 100 cm block” and then a “check color sensor” block, the robot will only check the color sensor after it drives 100 cm, not during. This often results in the robot driving past the intended color target without checking the sensor. If this happens, reduce the length of the drive block and have the program run a loop so it drives for a short distance (1 cm) and then checks the color sensor and repeats.
If/then statements allow the robot to make choices after receiving an input. All if/then statements can be reduced down to yes/no questions (“was the touch sensor pressed? yes/no”). They are useful if we want the robot to behave one way if the answer is yes and another if the answer is no. Flowcharts allow us to map out all of the possible if/then statements (yes/no questions) and possible responses. Students can use if/then statements to get their robot to respond to input from sensors as well. The robot sensors used in Open Roberta are: color (detects 8 different colors), touch (detects if touch sensor is pressed), ultrasonic (detects distance from an obstacle), and gyroscope (detects the degrees of rotation that the robot turns, self sensing). Only one type of sensor (the touch sensor) has only two inputs (yes, touching; no, not touching), so it can be used in an if/then statement. All other sensors have more than two possible inputs (for example, the color sensor has 8 possible colors), so students will have to use “logic blocks” to divide the inputs into two categories (for example: if we want the robot to find yellow, we can divide the colors into two categories: colors that are yellow, and colors that are not yellow).
When checking student programs, read through the program yourself before playing it on your own simulator. See if you can guess what it will do. Play it on your simulator and see if you were right. Often times programs that look like they wouldn’t work at first glance do actually work. I would encourage you to keep an open mind as to the solutions (workable programs) you accept as correct. As long as the achieve the desired objective, they are working programs. It’s also helpful to show a variety of solutions to students once they turn in a programming assignment, so they can gather new ideas from their classmates.
Getting ready
Setting up User-Group in Open Roberta:
Open Roberta allows teachers to great “User Groups,” accounts associated with one group or class that gives the teacher access to all student work via a teacher account that manages the User Group. For more info on how to set up User Groups, go to: https://www.open-roberta.org/wp-content/uploads/2020/11/Setting-Up-Open-Roberta-User-Groups.pdf
Materials:
Each student will need a device connected to the Open Roberta site: lab.open-roberta.org.
.
Lesson Implementation/Outline
Sequences
(30 mins)
Have the students discuss real life examples of a sequence. They can share verbally, via Peardeck, or via the chat on zoom. Some examples to help them start (a recipe, a dance, a song, an instruction manual). Using the following video (https://drive.google.com/file/d/1jeLp2DFR3nK7J5ov1X2wi_Oqfe1ywMgw/view?resourcekey), have student groups identify the steps of the dance sequence. They can use the included virtual worksheet to note their ideas.
Ask how a sequence is like a program. This will hopefully connect students’ everyday sequences with the idea of a program as a sequence.
Robot Square Dance
(1 hour)
Next, students will try to create a program that will make their robot drive in the shape of a square (robot square dance). To start the activity, all students must connect and login to Open Roberta. They will be able to program without logging in, but they will not be able to save their work (and you will not be able to view their finished program).
It will likely be useful for students to see you start the program by showing them how to select the advanced tab (#2 instead of #1 on the left side of the programming window), where the relevant blocks are (inside of the “action” tab, inside of the “drive” tab, there are “drive forward for _ distance” and “turn right _ degrees” blocks), and how to connect the blocks to the start blocks (only blocks connected to the red start block will be part of the program. When blocks are connected, they make an audible click. Open Roberta will only allow blocks that can go together to connect).
To open the Open Roberta SIM, click on the button on the right side of the coding window labeled “SIM”. To start a program, hit the play button on the bottom right of the SIM window. To stop, hit the same button again (now a red square).
Use the “Robot Square Dance” virtual activity sheet to help guide students through this activity.
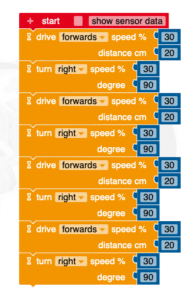
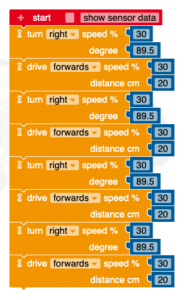
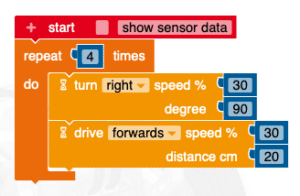
Possible working programs:
Note that the second program has 89.5 degrees, as students might notice the simulator does not turn exactly 90 degrees when asked. The third program uses loops and might be something a more advanced student would create:
Checking for student understanding:
After students complete their programs, share some students programs anonymously, some that work and some that don’t (or make up your own). Ask student to predict whether the shared program will get the robot to drive in the square and have them share why they think it will/will not work. Remind students that it is difficult to get a perfect program on the first try. Making a program (design/build), trying to run it (test), and fixing any issues (design/build) before testing again is an important part of an engineer’s design/build/test cycle.
Loops
(30 mins)
Ask students for examples of repeats or loops that are part of everyday sequences. Examples include: repeated steps of a dance (the Dance Sequence video is a series of loops), chorus of a song, “repeat step _” of an instruction manual, etc.
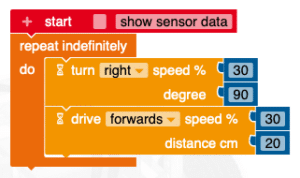
Have students add a loop to their robot square dance program to make the robot drive in a square forever. Use the “Loopy Robot Square Dance” virtual activity sheet to help guide students through this activity.
It will likely be helpful to remind students to use the advanced tab (#2 instead of #1), and to show them where the loop block is located (instead of “control” tab, inside of “loop” tab, the “repeat indefinitely do” block). The only steps that will repeat are those inside of the “C” of the loop block.
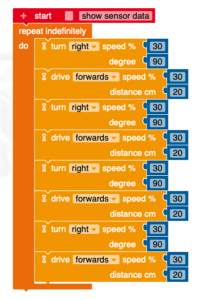
Possible working programs:
Note that the second program only has two blocks inside the loop. Technically the original robot square dance has 4 repeated sections, so this program (with only one drive forward and one turn right block inside a loop) still works!
Checking for student understanding:
Similar to the “Robot Square Dance” activity, after the activity is completed show students a set of programs (some working, some not) and see if they can predict what will happen.
If/Then Statements
(30 mins)
Show students example flowcharts that track how to make decisions in everyday activities (what to do if a lamp is broken, what to do when you wake up each morning, etc.). Make sure all questions in the flowchart are yes/no answers with a set behavior for either yes or no scenarios (Is it the weekend? Yes: Sleep in. No: Wake up early).
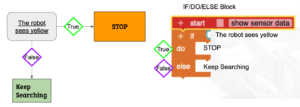
Connect the yes/no questions to 1/0 found in more pop culture ideas of code. At their core, computer code is a series of 1s and 0s, so yes/no questions work well for coding. Yes/no questions can be converted into true/false statements (It is the weekend: True: Sleep in. False: Wake up early), and that true false statement can be placed into an if/then statement (IF “it is the weekend” is TRUE, then “sleep in”, else (if FALSE) “wake up early).
Have students practice identifying what robot responses (movements) should occur when a given If/Then statement is true or false (see Intro to Programming slideshow for ideas).
Demonstrate how these true/false statements would fit inside a If/Then (also called If/Do in Open Roberta) block:
Checking for student understanding:
If there’s time ask students to write out their own flowchart for their wake-up routine with at least two yes/no questions. Have them explain why they chose each yes/no questions and how it helps them make decisions about their morning routine.
Sensors
(1 hour)
In this next activity, students will learn about the sensors available in the Open Roberta SIM robot: color sensor, ultra sonic sensor, touch sensor, and gyroscope sensor. In the “Sensor Worksheet” virtual activity guide, student teams are organized into a jigsaw where each student watches one video about a sensors and then records what they’ve learned onto the worksheet. It also asks them to brainstorm an organism or tissue that is similar to their sensor. The videos about each sensor explain how to open the sensor data panel, what data that sensor returns, and how the sensor works. The video also gives a few hints about what organism or tissue might be similar to the sensor. General information about each sensor can be found below:
- Color Sensor – Detects 8 distinct colors underneath a particular point on the robot. Data is represented by a color square in the sensor data panel. Sensor is similar to an eye. (The sensor averages colors, so if it is half on/half off a black and white area it will return grey as the color. Some times, depending on the shade, it will mistake green for blue and vice versa.)
- Ultrasonic Sensor – Detects distance from an obstacle (using sound waves in the real robot sensor but cartoon lines representing sound waves in the SIM). Data is returned as distance in centimeters. Sensor is similar to the echolocation of dolphins or bats.
- Touch Sensor – Detects whether the front of the SIM robot is touching something (represented by the yellow bar in the front of the robot turning red), Data is returned as a 1 or 0 (true or falsee). Sensor is similar to touch receptors in the skin.
- Gyro Sensor – Detects how much the SIM robot has turned. Data is represented by number of degrees (Clockwise is positive and counterclockwise is negative). Sensor is similar to the vestibular system or inner ear which detects rotation of the head.
To open the sensor data panel for the Open Roberta SIM, open the SIM (button on the right side of the coding window labeled “SIM”) and click on the button in the bottom left of the SIM window the circle icon (to the right of the EV3 button).
Checking for student understanding:
Have at least one student per sensor share what they have learned about their given sensor. This will make sure everyone is on the same page about all four sensors.
Sensor True/False Statements
(45 mins)
For the students to create a working Find Yellow program, they need to get the robot to react to changes detected by the color sensor. So they need to use the color sensor (at least) to get the robot to make a decision about what to do. However, if/then statements use true/false or yes/no questions, and the color sensor has 8 possible colors. So this next activity will teach how to convert a sensor with more than two possible data responses into a yes/no true/false set.
For the color sensor, we want to robot to react one way when the sensor sees yellow (stop) and one way when it doesn’t see yellow (continue searching). Therefore because we know what we want the robot to react to, we can create two sets of colors (yellow and not yellow). Using a logic box (light blue,first block in the “Logic” tab), we can create the blow logic statement:
![]()
(Green sensor block found in green “sensor” tab and yellow color block found in yellow “Colours” tab)
If we put the above block in an If/Then (If/Do) block (“Control” “Decisions” tab), then we can have it do one thing when the color sensor sees yellow (statement is true) and another thing when the color sensor does not see yellow (statement is false). As a side note, remind the students that the green sensor block is always changing depending on what the sensor reads at that moment (what color is the robot over now). The blue box allows the computer to compare what the color sensor sees right now to yellow (or whatever color is in the right section of the logic box) to see if it matches making the statement true. You can also change the equals sign to not equals or (for sensors that return numerical data) greater than, less than, greater than/equal to, and less than/equal to.
Student will use the “Sensor True/False Statements” virtual worksheet to help them practice making more of the above logic blocks.
Find Yellow
(1 hr and 15 mins)
Students should now have all the information and background to create a Find Yellow Program. Using the “Find Yellow” virtual worksheet as a guide, students can begin building their own program in the SIM.
It is likely that you will have some students that are done early and some students that are struggling. It’s recommended that you allow all students to start working individually, but once you have a few students that have finished early, rather than have them work on additional challenges (available in the virtual worksheet), see if they can help the students that are struggling. Additionally, you can have students save their program at a halfway point, check for common issues among students who haven’t finished, give the class a few hints and allow them to continue.
There are many possible solutions to the Find Yellow program, but here are a few examples of working programs. Note the first two are simpler with small variations in the sequence of the program. They will only work when the robot starts searching to the left of the yellow area (and is pointed at the yellow area). The third program is more complex and will search randomly over the whole SIM window (random number generator creates random turn each loop and touch sensor used to detect wall and have robot back up and turn around).
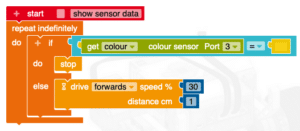
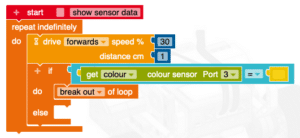
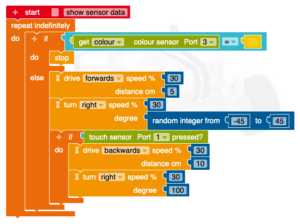
Any program that gets the robot to find yellow is a working Find Yellow program (unless the student programs the robot to move by distance only with any if/do/else blocks). We recommend praising simple and complex programs alike as each are valid solutions and have their own pros and cons.
Extensions/Reflections
Extension
Cellular Programming:
Do cells have their own programming? How can we reprogram cells?
A great extension to establish the robot as a model for cells is the Cell-to-Robot Word Map. This activity allows students to explore the central dogma (DNA à RNA à protein) and discuss which cell parts and cellular processes could be represented by robot parts and processes.
Sense and Response:
Do cells sense and respond like robots do?
A great extension to connect sense/response is the chemotaxis programming challenge paired with a chemotaxis activity with a live organism (i.e. physarum)
Final Challenges:
Ideally, the students will apply what they learned in this programming module to develop their own solutions to the final challenge mats (and chemotaxis mat).
NGSS
Topics
ETS1 Engineering Design
Performance Expectations
HS-LS1-3 From Molecules to Organisms: Structures and Processes
(Student model an organism’s search for food in the robot. This program often requires feedback loop whereby the robot checks its sensor and then moves again and again until it finds yellow, its food.)
HS-ETS1-2 Engineering Design
(Breaking down problems into smaller, more manageable problems is scaffolded for each program to guide students toward a solution.)
Science and Engineering Practices
Practice 1. Asking Questions and Defining Problems
Practice 2. Developing and Using Models
Practice 3. Planning and Carrying Out Investigations
Practice 4. Analyzing and Interpreting Data
Practice 5. Using Mathematics and Computational Thinking
Practice 6. Constructing Explanations and Designing Solutions
Cross-Cutting Concepts
Patterns
Cause and Effect
Stability and Change
Structure and Function
